Category Archives: Dinner

BURGERS & FRIES

Remember last week’s guest posts from Jessie about baking bread?  And remember when I told you that half of my batch of challah found its destiny in the form of some tasty, tasty hamburger buns?

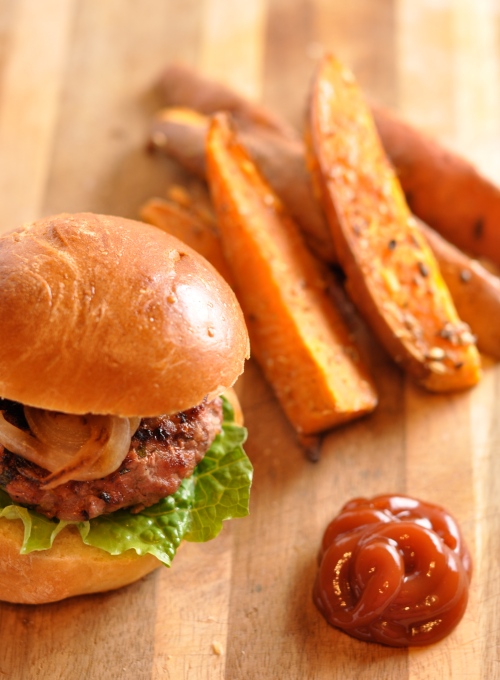
Now I’m not trying to tell you how to live your life, but there are few better ways to enjoy the changing season than home-cooked burgers and fries.  Burgers and fries, burgers and fries.  Have two things ever gone so well together?  Even their names have a kind of lulling rhythmic rightness: burgers and fries, burgers and fries.

There are approximately three zillion recipes out there for “the perfect burger,” “the diet burger,” “the California burger,” “the ultimate burger,” etc.  I’m not claiming this burger is any of the above, but it did make for a very satisfying Saturday night dinner.

BURGERS & FRIES

I will also say that I believe the quality of the ground beef I used had everything to do with how good these burgers tasted.  Jill and I purchase a meat share from a local farm here in Texas, and not only do we feel ethically good about supporting a small operation with well-treated animals, the meat just plain tastes better.  Like, light-years better.

And so if you haven’t, I urge you to check into and support small farms in your area.  You can search here or stop by your local Farmers Market.

for the burgers:

2 lb. ground beef
1 red onion
1 cup cheese of your choice (we used double Gloucester)
½ cup flat-leaf parsley
juice from half a lemon
salt & pepper (more of the latter than the former)

Peel & dice the onion, then sauté in a little olive oil until soft & translucent.  Set the onion aside to cool and in the meantime, grate the cheese & chop the parsley.

Combine all ingredients in a large bowl, mixing well with your fingers.  Form into patties of your desired size, keeping in mind that burgers shrink significantly when cooked.  I usually make my patties very round & tall so that they’ll even out by the time they arrive on a bun.

Grill outside or indoors on a grill pan/stovetop grill.  (You can also refrigerate pre-made patties ahead of time or flash-freeze on a cookie sheet first, transferring them to a freezer bag for future use.)

For an especially tasty burger, brush your buns with a little melted butter & add them to the grill for the last few minutes of cooking.  Garnish burgers with desired condiments: grilled onion, avocado, tomato, lettuce, pickle, Dijon mustard, mayonnaise, etc.

for the fries (adapted from Gourmet):

2 lb. sweet potatoes
1 tsp. whole coriander
½ tsp. fennel seeds
½ tsp. dried oregano
¼ tsp. red pepper flakes
salt
vegetable oil

oven: 425°

Cut the sweet potatoes into wedges—peeling them is not necessary.  Grind the spices together with a mortar & pestle or spice grinder (the latter will, of course, result in a much finer grind).  Place the potatoes in a large roasting pan; use two if need be, you don’t want to crowd the slices because they won’t crisp up.

Toss the potatoes with a few tablespoons of oil to coat, then add the spices, distributing evenly.  Roast for 40-45 minutes, turning the wedges halfway through and rotating the pans if you used two.

Sprinkle generously with salt before serving.  They are delicious plain, with ketchup, Sriacha, or this tamarind chutney.

SPAGHETTI CARBONARA

This weekend I watched my best friend eulogize his sister.  I watched his sister’s widower, who is thirty-one, eulogize his wife, telling the sweet story of how they met as undergraduates at Rice, their first date an Old 97s concert, their sixth anniversary just a few months ago, just a week or so before she died in the midst of an earthquake in Haiti.

The same week that Dave flew home to begin the long vigil of waiting for news of his sister, my dear friend Wayne sat in an ICU waiting room night after night, keeping company and logging time as his mother recovered from emergency brain surgery to remove a cancerous mass.

Today I spoke to Wayne on the phone—his mother is doing well, feeling strong and working her way through chemo and radiation—but Wayne’s fiancée Elizabeth, if you can believe it, has been diagnosed with a brain tumor of her own.  It woke them both up a few nights ago, Elizabeth gripped by a seizure, her body revealing its secret.

Understanding isn’t welcome here, friends.  Answers, even if we had them, would do no good.  The rain falls on the just and unjust alike, moral indignance to the contrary be damned.  If anything, what we can cling to is our insistence on aliveness, the instantaneous dose of perspective such news brings, like my realization that most of what’s on my to-do list is useless; my list of complaints and grudges, bullshit.  I know it shouldn’t take catastrophe to get me to pause, to “what the hell” and toss out my agenda in favor of face-to-face time with the people I love, but all too often, it does.

I sat across from Dave tonight, espresso cups balanced on a rickety table between us, as we have done so many times before in our decade of friendship.  Of course, everything has changed now, inextricably and irreparably and inexplicably.  I make mix CDs and I hug him tight and try not to say anything idiotic, hope furiously that loving someone as much as I love him counts for something in this long-run weigh-in with grief.

SPAGHETTI CARBONARA

Something about this dish screams “carpe diem” to me, perhaps because it’s so decadent without being fussy, comforting and dead satisfying.  It’s the kind of thing you make when you’ve abandoned any healthy pretenses and instead decide to serve up a bowl of something unguent, tangled mess of joie de vivre.

Disclaimer: this is not a strictly authentic version of carbonara, and I know that.  It is, however, a much less cluttered version than many you’ll find out there.  To strip down further, omit the parsley and use guanciale instead of panchetta, splurge on fresh pasta.

ingredients:

1 lb. linguini or spaghetti
¼ lb. pancetta, roughly chopped
3 eggs
3 cloves garlic, crushed & minced with a little salt
¾ cup Parmesan or Pecorino Romano
¼ cup dry white wine
½ tsp. red pepper flakes
black pepper
olive oil

optional garnish: chopped flat-leaf parsley

First things first—get the pasta going.  Cook it as you normally would, but be sure to save about a ¼ cup of the cooking liquid when draining the noodles.

In the meantime, heat a little olive oil over high heat, then add the chopped pancetta and cook until it begins to brown.  When it does, turn down the heat to medium and add the garlic.  After about 5 minutes, your kitchen should be nice and fragrant.  Pour in the wine and let it cook down, another 5 minutes.

Sprinkle the red pepper flakes atop the garlic-panchetta brew.  In a separate bowl, crack and gently beat the eggs.  Add in the pasta water and beat further—this is to temper the eggs and keep them from scrambling when you add them to the hot pan, which you are about to do.

Bring everything together: remove the pan from heat, then add the drained pasta.  Pour the egg mixture over everything, tossing rapidly to coat.  Sprinkle on your cheese and grind in a generous helping of pepper, then mix again.

Serve hot, with parsley and a little extra cheese as garnish, if you wish.

Share/Save/Bookmark

MINESTRONE

I didn’t grow up with many males in my life—twelve years in an all-girls’ school and no brother will do that to you—so it wasn’t until high school that I really began to build friendships with them.

Now, thankfully, there are these men in my life whom I love.  I mean, really, really love.  Men who can make me laugh with a one-line email, men who appreciate the noise my high heels make on pavement, men who care deeply for the people in their life, who watch “The West Wing” on DVD and keep Lincoln biographies and cookbooks and Spanish poetry and young adult fiction all stacked by their bedside.

Who have crushes on Mary Louise Parker.  Who have held my hand in art museums, or held me on a couch the night after my father’s funeral, or held their palm gently against the small of my back, ushering me into a door or through a crowded room.  Who write the most incredible letters, which I will save forever.  Who love their wives, their fiancées, their girlfriends, their sisters, mothers.  Who chide me into staying a little longer and drinking another beer (or Scotch or glass of wine).  Who will happily eat anything I put in front of them.


I look at my fourteen-year-old male students, who are so earnestly figuring out how to be men, how to flirt, how to build character, integrity, and swagger, and then I look at these men in my life: Dave, Phil, Stephen, Wayne, and I feel tremendous joy for the men I know my boys will grow up to become.

MINESTRONE

This recipe makes a big batch, but minestrone is the perfect “it’s still cold outside” refrigerator space-taker.  I always like to have mine with a good, golden-crusted grilled cheese.

1 large yellow onion
3 cloves garlic
3-4 small zucchini
3-4 small yellow squash
2 bunches fresh spinach (can substitute frozen), washed & roughly chopped
1 large (28 oz.) can crushed, fire-roasted tomatoes
4-6 cups chicken or vegetable stock
2 cans kidney beans
2 T tomato paste
1 T dried oregano (double if using fresh)
¼ cup fresh flat-leaf parsley, chopped
salt & pepper
olive oil

secret ingredient: Parmesan rind
optional: a few cups of cooked pasta

Dice the onion & mince the garlic.  In a large soup pot or Dutch oven, heat a fair amount of olive oil over medium-high heat.  Throw the onions in first and cook until they are a bit brown, then dial back the heat to medium and add the garlic.

While those two ingredients are making your house smell incredibly delicious, cut the zucchini & squash into small cubes, trying to keep them uniform without worrying too much over precision.  Add to the pot & sauté 5-8 minutes, until soft.

Now it’s time to toss almost everything in and let soup magic happen.  Tomatoes, stock, herbs, tomato paste, & Parmesan rind, if you’re using it.  Let your soup simmer for at least 45 minutes before adding the fresh spinach in batches, folding it in so it will wilt on its own in the hot soup.

Pull out the Parmesan rind (it will be gooey!) and toss in the beans, plus pasta if you’re using it.  Once everything has heated through, serve up in bowls or big mugs, garnishing with some fresh Parmesan and/or extra parsley, if you like.

Share/Save/Bookmark

CHICKEN & DUMPLINGS

Regarding the pain of others, I am ever at a loss.

I haven’t gotten any better at figuring out what to do with these masses of grim humanity that get hurled our way, without warning, without reason, without pattern.  How are we to negotiate a world in which I can sit here, typing away on an expensive computer in a comfortable home stocked with food and supplies, while a few hundred miles south and east of me survival is far from certain and bodies are piling up in the street?

At the gym this week I found myself standing on the elliptical machine, my usual routine interrupted by this footage of the rawest, gnarliest grief and despair in a place that really isn’t that far away from me at all and I thought to myself AND WE ARE WORRIED ABOUT BURNING SOME CALORIES?

Paradox is the sea we all swim in.  I think perhaps the trick is to be aware of our contradictory selves, to fleece out any illusions about this wild and willful world.  To delight in what there is to delight in, to mourn what there is to mourn.  To give our best shot to holding it all in somehow.  To look at the screen, because we must.

My old neighborhood in Tucson was very close to the University and its Medical Center; a whole crew of dogs lived on our particular block, lording over dusty yards behind battered fences.  Whenever an ambulance would go by, the dogs would howl.  Pure, unadulterated noise.  It always seemed to me an appropriate herald: here, you see, pay attention, someone’s life is changing forever.

Two of my favorite people in the whole wide world are right now in the hardest possible places: waiting for news about mother and sister, respectively.  The former in a hospital ICU, the latter in Haiti. I love these human beings so much, more than I can rightly say and yet I cannot make their pain go away, I cannot fix this, I cannot do anything that will make a damn difference.

This is me, howling.


CHICKEN & DUMPLINGS

Sometimes all you can do is dish up a big pot of comfort, stand over the stove with a whisk in hand, scrape dumplings with all your heart and trust that it all adds up to something.

I’m from Memphis, so it’s practically a genetic obligation to be able to make this stuff.  Started adding leeks a few years back when I saw the idea in Cook’s Country magazine—I like the flavor they add, but it’s especially nice to have a dimension of color in the stew which is traditionally all-white.  While I don’t like to clutter my chicken & dumpling up with other veggies, you could easily add diced carrots to the leeks & onions and/or toss in frozen peas at the end.

Also, I’ve at times made a modified version of this recipe which is a little bit less high-maintenance and ostensibly healthier, given that it doesn’t involve rendered chicken fat.  If you have chicken stock & leftover roasted chicken, you can skip steps involving browning the thighs & just add your chicken meat to the stew when you pour in the milk.  Since you won’t have schmaltz for the dumplings, substitute butter.

for the broth:

4 bone-in, skin-on chicken thighs

3 leeks, white & light green parts only, cut into thick rings & then in half

1 large yellow onion, diced

3 T flour

3 T dry sherry or cooking sherry

4 ½ – 5 cups chicken stock, preferably homemade

¼ cup whole or 2 % milk

2 T fresh or 2 tsp. dried tarragon

1 T fresh or 1 tsp. dried thyme

1 bay leaf

vegetable oil

butter

salt & pepper

for the dumplings:

1 ½ cups flour

1 T baking powder

1 tsp. salt

½ cup buttermilk

2-3 T chicken fat or butter

equipment: If you have a Dutch oven or enameled soup pot, this is the occasion to use it.  If not, use something tall with a heavy bottom.

Get your chicken nice and dry with the aid of some paper towels—this step is essential or it won’t cook up properly.  Season the chicken generously with salt and pepper, then heat up a few tablespoons of vegetable oil in the bottom of your pot over medium-high heat.

Brace yourself for some splattering–cook the chicken until the skin is brown & crisp on both sides, about 4-6 minutes on each side.  Move the chicken to a plate to cool a bit.  Pour off and reserve the delicious! chicken! fat! that has gathered at the bottom of the pot.  (You’ll use some of it for the dumplings, but I urge you to save whatever’s leftover for adding flavor to soups, roasts, even pie dough).

Return the pot to medium heat & melt a big ole knob (2-3 T) of butter in the bottom.  Add the leeks and onions to cook until soft, about 8 minutes.  Sprinkle flour on top of the vegetables, then whisk in the sherry, thickening the broth base.  Scrape the bottom of the pot to get all of the juicy bits, then stir in the chicken stock, milk, & herbs.

Remove the skin from the chicken thighs, then return them to the pot, cover it all, and let them simmer in the goodness to cook fully, 30-45 minutes.

When the chicken has cooked fully, turn off the heat and remove the thighs & the bay leaves from the pot.  Using forks, carefully shred the chicken meat off of the bone & return it to the pot.  Check and adjust the salt & pepper in the stew, then bring it back up to a simmer for dumpling-dropping purposes.

For the dumpling dough, combine all ingredients in a small bowl and stir until it looks like unappetizing paste.  Fret not!  They are going to taste de-li-ci-ous.  Using two big spoons, gather up a tablespoon’s worth of dough into one spoon then scrape it into the stew with the other. You’ll get the hang of it.

Fill the top of the pot with dumplings, leaving a bit of room because they will grow.  Reduce the heat on the stove to low and let the dumplings cook, turning them once, after about 10 minutes.  Cook the other side of the dumplings for another 10 minutes and then serve.

Share/Save/Bookmark

THE FOOD OF MY PEOPLE: GREEN BEAN & SWEET POTATO SABJI

Please allow me to begin with the requisite disclaimers: I am but one Indian girl.  I do not represent all Indian people everywhere and I am by NO MEANS an expert on Indian food or cooking.  India is home to twenty-eight states, twice as many languages, and innumerable incarnations of what “Indian food” can look like.  Not to mention the fact that we Indians have disseminated ourselves all across the globe, mish-mashing our food cultures with the British, American, South African, Malaysian, etc.

Still…when I put out the call the other day to see what folks wanted to see more of on the blog, Indian food was the definite winner.  So I am giving in!  “The Food of My People” series starts today and will run every Tuesday for the next few months.  Don’t worry, for those of you utterly uninterested in making Indian food at home (no offense taken), “regular” fare will continue to show up every Friday.

The Indian recipes I’m going to post will be a total hodge-podge of regions and technique, utterly subjective and reflective of me.  They will also be fantastically delicious and adhere to the BJG standard of unfussy food OR fussy food that’s worth it.  I hope to expose you to more Indian “home cooking,” the kind of thing you can’t get in a restaurant and can pretty easily make at home (lots of those restaurant dishes aren’t very authentic or simple to make).  If you have any requests, throw them out in the comments or send me an email.  I’ll do my best to accommodate them!


One of the main things that can make cooking Indian seem intimidating are the seemingly exhaustive lists of unfamiliar ingredients; even I think it’s asking a lot for folks to go out and buy twenty spice bottles just to try one recipe.  For the purposes of this series, I’m listing some essentials and extras, the latter of which will serve those of you who’d like to build your Indian food repertoire.  If you’re uncertain about how frequently you’ll use these ingredients, I recommend you buy in small quantities (at a store which sells in bulk is a good choice.)  For the extras, get yourself to an Indian or Asian grocery store!  They can help you find what you’re looking for and the prices will be much cheaper.

ESSENTIALS:

•    fresh garlic
•    fresh ginger
•    onions
•    whole cumin seeds
•    ground cumin
•    ground coriander
•    ground red mirchi (chili), for heat

EXTRAS:

•    asafetida
•    cardamom
•    fresh cilantro
•    cumin seeds
•    fennel seeds
•    fenugreek seeds
•    garam masala
•    mustard seeds
•    sambar powder
•    turmeric

You’ll find that this recipe, like most of the rest I’ll be posting, makes a pretty good quantity of food.  That’s because I DON’T KNOW HOW TO MAKE SMALL AMOUNTS OF INDIAN FOOD.  It’s like, contrary to what I believe in.  You know?  Ethnic mothers who stuff you full at the table, then send you out the door with a plastic grocery bag full of old sour cream and Cool Whip containers, stuffed with leftovers?  I’m totally turning into one.

GREEN BEAN & SWEET POTATO SABJI

Serves 4 as a side, with leftovers

“Sabji” just means vegetable dish and this one is a favorite.  Simple and satisfying, this dish is a riff off of my mom’s original, which she made with white potatoes.  I personally like the way the flavor of the sweet potatoes plays off of the rich spices in this dish; serve it as an accompaniment to a meat entrée or as the main course itself, with store-bought naan or pita bread.

This recipe calls for just a few tablespoons of tomato paste, so opening a whole can of it is a pain.  I am in love with these tubes of paste from Amore.  Use what you need, then store the rest neatly in your fridge.

•    4 medium-to-large sweet potatoes
•    1 pound green beans
•    1/4 cup fresh ginger, peeled & minced
•    1 T black mustard seeds
•    1 T sambar powder
•    2 T tomato paste
•    ¼ teaspoon asfoetida (optional)
•    ½ cup water
•    3 T canola oil
•    salt

Prep the vegetables: peel & dice the sweet potatoes into roughly 1-inch chunks, then wash & remove the ends from the green beans, chopping them into inch-long pieces.

In a large, heavy-bottomed pan (with a fitted lid), heat the oil over medium-high heat. After 3-4 minutes, the oil should be quite hot but not smoking. Throw in the mustard seeds & sprinkle in the asfoetida. It’s essential to heat these two ingredients at the outset and let them get very hot or they will make the whole dish taste bitter.

Turn down the heat to medium; remove the pan from the heat, then add ginger. Return to the burner and cook until the ginger begins to soften, adding the sweet potatoes, sambar powder, water, & 1 T salt. Toss to ensure that the potatoes are well-coated with the spices.

Cover the dish, turn the heat down to medium-low, and allow the sweet potatoes to cook until tender, about 15 minutes.  Once you can “smush” a sweet potato with the back of your cooking spoon, add the green beans and cook for another 8-10 minutes, tossing in more water if necessary.

Once the green beans are bright and cooked to desired tenderness, fold in tomato paste to bind the dish. Taste the dish for salt & season accordingly.

Share/Save/Bookmark

FOCACCIA

Yeast doughs don’t have to be scary, I promise.  They can actually be rather friendly, spongy and springy and smelling of earth.  You mix some humble and frankly unimpressive ingredients together (flour, water, sugar, salt, & oil), contribute a little sweat in the form of kneading, then leave it all in a bowl and walk away, only to come back in a few hours to find this:

Well, okay, the focaccia won’t actually make itself, but that would take the fun out of it anyway.  Then you’d miss out on the authentic, even sexy experience of standing at a floured counter, working through the contents of your mind via a big hunk of dough.  Not to mention the satisfaction of your teeth meeting the firm crust and pillowy crumb of bread you made BY YOURSELF.

You can top your foccacia with any combination of flavors you like; I will only recommend that you use good quality stuff.  Pair the fresh bread with a big, green salad and bottle of wine.  Finish with a cheese course if you’re feeling decadent.

This week, I asked my students to write Six-Word Memoirs and their examples were so fascinating, so varied, so revealing of who-they-are that I posed the question to my Facebook friends, too.  Some of my favorite results:

cheer for many, fan of few.
outgoing is fine, I try outrageous.
drop-out, divorced, drug-addict, better now, thanks.
I shouldn’t have told you that.

As for mine, I wrote half-a-dozen, felt like I couldn’t settle on one, but in writing this post, I am sure of it now: In the kitchen, I am free.

What’s yours?

FOCCACIA
original recipe from Saveur.com

I can’t rightly call this recipe “adapted,” since all I’ve really done is alter the method & play with the toppings.  Though the original recipe calls for you to top the dough with olives and tomatoes before baking, I found that this resulted in charred and chewy toppings—unappetizing, to say the least.

My strategy to combat this is two-fold: mix heartier toppings (such as caramelized onions, olives, or chopped rosemary) into the dough, save more delicate toppings (flat-leaf parsley, sundried tomatoes, or Parmesan) for topping, either towards the end of baking time or once the foccacia’s already been removed from the oven.

Basic dough:

1 ¼ tsp. active dry yeast

2 tsp. sugar

3 ½ cups flour, more for kneading*

1 T + 1 tsp. kosher salt

extra-virgin olive oil

Coarse sea salt

Possible add-ins/toppings:

Caramelized or raw onions
Black or green olives
Parmesan or feta cheese
Fresh or sun-dried tomatoes
Fresh or dried herbs: rosemary, parsley, oregano

oven: 475˚
pan: cast-iron skillet, deep-dish pizza pan, or a shallow, enamel-glazed pot

Combine yeast, 1 teaspoon of sugar, & ¼ cup warm-but-not-hot water.  The official temperature requirements are between 110-115 degrees, and I recommend you use an instant-read thermometer if you haven’t made a lot of bread before.  After a few batches, though, you’ll get a feel for the right heat on your fingertips.

Let the yeast mixture sit about 10 minutes—it should be foamy.  If it’s not, toss it out and start again.  Whisk together the flour, remaining 1 tsp. sugar, & salt in a large bowl.  Make a well in the center and pour in the yeast mixture, 1 T olive oil, & 1 cup warm water.  Mix with your hands until it holds together.

On a floured counter or work surface, knead the dough until smooth and elastic, about 10 minutes.  Curve the dough into a ball & place it in the bottom of a well-olive-oiled bowl.  Cover the bowl with a kitchen towel & let the dough rise in a warm place until doubled in size, ~90 minutes to 2 hours.

After the first rise, preheat the oven to 475˚.  If mixing in ingredients, now is the time to do it, working any additions into the dough.  Liberally rub the pan you’re using with (still more!) olive oil, then transfer the dough to the pan, flipping it over once so both sides are coated in oil.  Gently stretch the dough to fit to it to the bottom of the pan.  Cover the whole thing with a kitchen towel and let it rise another hour.

Use your fingertips to dimple the surface of the dough, then drizzle with olive oil and sprinkle with sea salt.  Bake until golden brown and cooked through, approximately 30 minutes.  If the surface of the foccacia becomes too dark, cover with aluminum foil for the remainder of baking time.  Top as you wish, either during the last few minutes of baking or once the foccacia’s come out of the oven.  Cool slightly on a wire rack before serving.

*You can make your foccacia whole-wheat by swapping out one cup of the all-purpose flour for the whole-wheat variety.  It’s pretty good!…though I prefer the more sinful regular all-white-flour version.

Share/Save/Bookmark

MY MOM’S SHRIMP CREOLE

I don’t really know how my mom got to be such a badass cook.

{Facts about woman who brought me into the world—
She does not care for: goat cheese, the word “widow,” or folks who do not vote.
She is rather fond of: peanuts in all forms, the Allman Brothers song “Rambling Man,” & character-driven fiction.}

Like most Southern-women-who-can-make-anything-taste-good, she never had any formal training.  She can make thrifty one-pot or decadent dinners, improvise or plan something elaborate.  She has dishes for which she’s famous, the kind folks often request, she keeps a well-stocked pantry, bar, & wine rack, and of course, will insist that whatever item of hers you just ate which made you seriously think about licking your plate was “really no big deal.”

However, unlike many other Southern-women-who-cook-real-good, my mom isn’t actually from the South.  She was born in the mountainous and politically troubled region of Kashmir, India, and grew up in a household without a mother to learn from in the kitchen—though she did pay attention to the cooks her father employed.  When she and my father were newly married, my mom was suddenly responsible for all of the household cooking (and for an extremely fussy husband, I might add).

What I admire especially about my mom is that she never does anything halfway.  A new position at work means she’ll throw herself into graduate-level classes (even though she already has TWO masters degrees) to ensure she does the best possible job.  A trip to the wine store is always accompanied by a well-researched list and notes.

So in moving to a new continent and into myriad new food cultures, my indomitable mother took it all on.  She experimented until she could reproduce her and my father’s favorite dishes from home, inventing plenty of her own along the way.  But she also dove into learning America’s food culture—woman makes mean spaghetti & meatballs, squash casserole, and this shrimp creole.

Growing up, we ate this every New Year’s Day, so I’m actually running about a week late in posting it.  The bright side, though, is that while this dish is warm, homey, and comforting, it’s actually not so bad for you, so if you’re experiencing post-holiday-food-and-drink-consumption-guilt (I know I am), you can still fit this on your January meal plan.

Up until a few months ago, I had only ever eaten this dish over wild rice, and for good reason—it’s yummy that way.  But when I had some leftovers hanging out in my fridge and no wild rice in my pantry, inspiration struck.  I did have polenta, and topping it with this creole made for one of the best plays on shrimp & grits I’ve ever experienced.

My mom taught me pretty much everything I know about food, passing on her passion for collecting cookbooks, stocking the fridge with a million condiments, and clipping recipes for an ever-expanding file.  Though she makes fun of me now for going through “so much trouble” to try strange or elaborate dishes, she’s the one who once made her own pomegranate liquor, so I don’t think she has much room to talk.

Love you, Amma.  Lots & pots.

SHRIMP CREOLE

Like most dishes that originate from my mother’s kitchen, this one’s not fond of exact measurements.  I’ve done my best to accurately capture the method & flavor here, but this recipe is designed for tinkering.  Fiddle away—it’s still bound to taste good!

This concoction is best made ahead, and therefore is conducive to dinner guests.  Just be sure to reheat the sauce separate from the shrimp, adding them at the end so they don’t get rubbery.

1 ½ – 2 lb. shrimp, peeled & deveined
1/3 cup ketchup
2 T Worcestershire sauce
1 T garlic powder
1 tsp. (½ if you’re heat-shy) Tabasco sauce

Gently mix the above together.  Stash in a non-metal bowl in the refrigerator while you prep the vegetables or for up to two hours.

2 medium yellow onions
2 green bell peppers
4 ribs celery
— (fun fact: the above three items are considered “the trinity” of Cajun cooking, a riff on French cuisine’s mirepoix of onion, celery, & carrot)–
3 cloves garlic, minced
2 (14 oz.) cans fire-roasted tomatoes
1 small can diced tomatoes with green chiles
2-4 cups chicken or vegetable stock, for thinning*
1 tsp. oregano
olive oil
salt & pepper

Peel & dice the onions, seed & dice the peppers, trim the ends off of & dice the celery.  You want everything to be about the same size—I like ½ inch cubes.

In a heavy-bottomed soup pot or Dutch oven, pour in a generous swirl of olive oil and bring up to medium-high heat.  Cook the shrimp (in batches if necessary) until pink, just a few minutes on each side.  Remove shrimp to a bowl but don’t clean out the pot.

Toss in the onions and garlic first.  When they begin to sweat, add the bell peppers.  Celery comes last.  Once all of the vegetables have cooked, add the tomatoes & oregano.  Thin with your desired amount of stock and let simmer at least thirty minutes, but up to a few hours.

At this point, I like to taste the base and will probably toss in some extra Tabasco & Worcestershire sauce, plus salt if it’s needed and lots of pepper.  Once things are tasting dee-li-cious, add the shrimp and any accumulated juices back in.  Turn off the stove at this point–the creole should be hot enough to re-warm the shrimp without any added heat.

Serve over wild or white rice, polenta or grits, even pasta.

*I like my version of this dish to be quite chunky, while others prefer a thinner sauce.

Share/Save/Bookmark//

SPAGHETTI & MEATBALLS

It’s always a good idea to revisit a classic.


My students and I are finishing up our unit on To Kill a Mockingbird this week and I’m breathing a huge sigh of relief.  I was so hesitant to teach this text—some of you know that I switched from sixth to eighth grade English for this year—because I just didn’t know if I could do it justice.  Never have I been asked to teach a book I hold so close to my heart, and I was scared.

I read To Kill a Mockingbird for the first time in the seventh grade.  My teacher, Mrs. Zehring, was a goddess whom we all worshipped; we were captivated by her, and so then by extension, the book.  I’ll never forget the afternoons sitting in that classroom, listening to her read passages from the book aloud in her lilting Southern accent.  The intensity of the storylines surrounding Boo Radley and Tom Robinson, the innocence and feistiness of Scout, the quiet and courageous dignity of Atticus—all of it made a profound impact on me.

Since then, I have read To Kill a Mockingbird many times, marveling in the adept writing, haunted by the timelessness of the social commentary, being ever moved to tears at the end.  What if I couldn’t convey all of this to my students?  What if they didn’t “get it?”  What if I became unfairly frustrated with them because I was so attached to the book?


I needn’t have been so worried.  Coming to the book as a teacher has only deepened my respect for and awe over its power, especially as I’ve watched my students go from skeptical (“It’s so confusing!”) to interested (“Okay, it got kinda good.”) to deeply impacted (“OMG, I cried!”).  And, of course, they have shown me facets of the book that feel new, energizing.  They have renewed my faith that classic literature really is classic—that it can still be read and cherished in a Lady Gaga, podcast kind of world.

For a dinner classic, I urge you to revisit spaghetti & meatballs.  If nothing else, the basic marinara sauce is worth getting under your belt.  The meatballs, while time consuming, are crazy-delicious.  Lighter and more flavorful than the ones you might have grown up eating, these still satisfy that “bowl o comfort” craving at the end of the day.


SPAGHETTI & MEATBALLS

My philosophy is that if I’m going to go through the trouble to make homemade marinara sauce and meatballs, I’d might as well make a bunch of both.  The sauce freezes so well, and on a night when you really need it, will help you answer the inevitable “What are we having for dinner?” Think: pasta, pizza, chili.

You can also freeze the meatballs, of course, either on their own or in the sauce.  But don’t feel limited to serving the two together—the meatballs will work just as well on a sandwich or you can toss them into all kinds of soups.

This recipe is very forgiving, so feel free to improvise as you see fit.

for the marinara
:

2 large yellow onions, diced
6-8 cloves garlic, minced (may sound like a lot, but I promise it mellows)
½ cup red or dry white wine
3 (28 oz. each) cans whole tomatoes
¼ cup tomato paste
¼ cup balsamic vinegar
1 T dried oregano
1 tsp. crushed red pepper
olive oil
salt & pepper

optional: fresh basil, to finish

In a large, heavy-bottomed pot, heat 3-4 tablespoons olive oil over medium heat.  Add the onions and cook 1-2 minutes before adding the garlic.  Cook together until translucent and soft, 8-10 minutes more.

Crank up the heat to medium-high and pour in the wine.  Reduce that mixture down until it’s thick and syrupy.  Now it’s time to toss everything else in: the tomatoes, tomato paste, balsamic, oregano, & crushed red pepper.

Allow the sauce to heat up until it’s bubbling, then turn down heat and simmer the marinara for at least 45 minutes, preferably an hour or two.   Serve as-is OR add meatballs to heat through (see below) OR cool and freeze the sauce for later use.


for the meatballs:

2 lbs. ground meat*
1 medium onion, diced
3 cloves garlic, minced
¾ cup day-old bread, preferably white or an Italian-style loaf
approx. 1 cup milk, preferably 2% or whole
½ cup grated Parmesan cheese
½ cup parsley, roughly chopped
1 tsp. lemon zest
salt & pepper
olive oil
vegetable oil

Sauté the onion & garlic in a small skillet with olive oil over medium heat until soft and translucent (sensing a theme here?).  Set aside to cool.

Tear or chop the bread into small pieces, then pour milk over the bread, enough to cover all of the pieces.  Let sit for five minutes, then remove the bread, squeezing out any excess milk.   Trust me on this, okay?

Add the milk-soaked bread to a large bowl, along with the cooled onion & garlic, parsley, lemon zest, and generous amounts of salt & pepper.  Using your hands (really, you must, and it’s so much fun anyway!), mix everything thoroughly.

Again, using your hands, shape the meat mixture into meatballs of the size you prefer—I like mine with a 1 to 1 ½ inch diameter—and line them up on baking sheets.

I use a deep, very heavy-bottomed saucepan for meatball-cooking purposes, and an oil ratio of 3 parts olive oil to 1 part vegetable oil.  The oil needs to get rather hot (not quite to smoking) and I recommend you wear long sleeves when you do this—safety first!

Cook the meatballs in small batches—don’t crowd!  Brown the meatballs on all sides (remember, you’re not cooking them through) and then return them to a clean baking sheet.  Depending on the size of your pan, each batch will take 8-12 minutes.

To finish the meatballs, you have a couple of options: toss them in the hot marinara sauce and let them simmer for about twenty minutes, or do the same with hot soup broth.  Otherwise, the meatballs can finish cooking in a 350˚ degree oven, 12-15 minutes if smaller, 15-20 if bigger.

Cool the meatballs thoroughly before freezing OR cook up some pasta and bust out the Parmesan.

*I have used all combinations of meats with great success: all ground beef, half beef/half pork, half beef/half ground turkey, all turkey.

TAKING STOCK & MAKING SOUP

Around here we say, “unfussy food from a fun-loving kitchen.”*  Essentially, what that means to me is you can make great food at home without slaving away for hours or blowing your budget on fancy ingredients.  The kitchen is a place where we should all feel free to make mistakes and make a mess, to play and focus, to relax and to express.  If it isn’t fun, or at the very least rewarding, we won’t do it.

To me, there’s no inherent virtue in fussy.  You know, three different curlique garnishes, half-a-dozen specialty ingredients, recipes that could fill a dishwasher with bowls and dishes just from the prep work?  I don’t do fussy for fussy’s sake.  But if the fuss is going to get me something, like crave-able onion rings,  light, buttery popovers, or delicate almond cookies sandwiched with jam and chocolate, then I’m totally in.

I first tried making my own stocks and broths in graduate school because I was on a serious budget, and it was the frugal thing to do.  Of course, I knew somewhere in the back of my mind that once I started making my own versions, I wouldn’t be able to buy the pre-packaged stuff anymore.  Hours of slow-simmered goodness from your own stove, it’ll spoil you.

It’ll also make you feel worthy of your grandmother or [insert personal kitchen icon here].  Making homemade stock, which you can then use in homemade soups and stews, is the ultimate I CAN DO THIS moment.  Make your own stock and see if you don’t feel like a bona fide, authentic, oh-so-capable blue jean gourmet!

Oh, and have I mentioned how easy it is?  All you really need is an extended period of time at home so you can let the stock simmer and check on it from time to time.  Four to six hours later, you’ll have a house that smells like heaven (warning: this can drive dogs craaaaaazy) and stock that’s richer and more flavorful than anything you can buy in a box or a can.

Of course, if you give a mouse a cookie, he’s going to want some milk to go along with it, and if you decide to make stock, you’re going to want to cook with at least some of it ASAP (freezing the rest for future use, of course).  So I’m including an easy, hearty dinner soup recipe that will serve your new stock well.

Should you wish to go all the way with the “fussy but it’s worth it” theme, might I suggest you tackle the infamous Boeuf Bourguignon?  Made famous by the fabulous Julia Child and then re-famous by Julie & Julia fever this year, it really is something you ought to make at least ONCE in your culinary lifetime.  I made some this summer for Jill when I discovered she’d never had it.  She’s still raving about it, I tell you.

More interested in chicken, chicken stock, & chicken soup?  Don’t worry, we gotcha covered.

*Coming soon to a kitchen apron near you!  Yes, really.  Stay tuned.

BEEF STOCK

To make your own beef stock, you can simply buy soup bones from a butcher or save the bones from roasts & steaks as you cook.  If you are working with bones that have already been cooked, you can use a stovetop method: simply sauté all of the same vegetables listed below in a stock pot with some olive oil until soft & fragrant.  Then add the water, bones, & seasonings.

4 lb. beef soup bones (uncooked)
2 red onions, quartered
3 carrots, chunked
3 ribs celery, chunked
3-4 garlic cloves, peeled & smashed
2 T tomato paste
1-2 bay leaves
fresh thyme or rosemary
salt & pepper

optional: splash of red wine
oven: 450˚

Place the vegetables on the bottom of a large roasting pan.  Drizzle with olive oil, then place the soup bones on top.  Season everything liberally with salt & pepper.

Roast in the oven for 25-30 minutes, then transfer the contents of the roasting pan (plus any delicious, accumulated juices) to a large stock pot.  Fill the pot with as much water is needed to cover everything, somewhere around 8 cups.

Toss in the herbs, tomato paste, & red wine (if using).  Bring the mixture up to a boil, skimming off any foam that initially rises to the top.  then let the stock simmer gently for at least four hours, allowing it to reduce.

Taste-test the stock before deciding it’s through.  When you’re ready, strain the stock & save the meat from the soup bones for your dog or another purpose.

If you wish to skim the fat from your stock, the easiest way to do so is to refrigerate the finished stock in a large plastic container.  When it’s nice and cool, the fat solids will rise to the top, making them easier to removed.

Me personally?  I like fat.  It tastes delicious.

Once thoroughly cooled, beef stock will keep well in the freezer for several months.

ITALIAN SAUSAGE SOUP

Inspiration for this soup comes from Jill’s mother—my version is a bit different, but like hers, it’s hearty, easy to make, & goes wonderfully with a pan of cornbread or sliced loaf of crusty bread.  Like most soups, this one just gets better after a few days in the refrigerator!

The more flavorful the sausage, the more flavorful the soup.  Splurge, if you can, on well-crafted product, preferably fresh sausage from a grocery counter (as opposed to something frozen or packaged wholesale).  A tip—if you are a fan of parmesan cheese, save the rind!  I always add them to my soups, especially this one, and they impart excellent flavor.

6 cups beef stock
1 lb. Italian Sausage (hot or mild—the choice is yours!)
1 onion, sliced
2-3 cloves garlic
2 bunches fresh or 1 package frozen spinach
2 cans chickpeas, drained
fresh (1 T each) or dried (1 tsp. each) basil & oregano
olive oil
salt & pepper (1 tsp. each)

Slice or crumble the sausage into a tall, heavy-bottomed pot.  Turn heat to medium and brown the sausage, in two batches if necessary.  Transfer the browned sausage to a bowl with a slotted spoon.

Without cleaning the pot, add a bit of olive oil and cook the onions and garlic until translucent.  If you’re using frozen spinach, you’ll need to thaw & drain it while the onions cook.  If you’re using fresh, wash & dry it well before adding it to the onions & garlic, allowing the leaves to cook down quite a bit.

At this point, return the sausage to the pot along with the rest of the ingredients: stock, chickpeas, herbs, salt, pepper, & frozen spinach (if using).  Bring the soup to a boil, then simmer on low heat for at least thirty minutes before checking for flavor and adjusting salt, if necessary.

Serve hot.  Feel free to grate some parmesan on top—but only if you want to.

Share/Save/Bookmark

KAREN’S MEXICAN RICE & “GRAD SCHOOL” BLACK BEANS

I cut my hair short in high school, for many reasons and for no reason at all.  Convenience, defiance, sophistication, some combination thereof.  It ranged from ear-length to pixie-short until I buzzed it all off my freshman year of college.  Head-shaving was the social experiment that I undertook with my fortuitously-assigned college roommate Rebecca. Bolder and defiant than I could conceive of being at that point in my life, Rebecca was my first true friend on campus (and remains one of my favorite people on the planet, I might add).  Shaving our heads was her idea.

Bless my poor father’s heart—he always harbored visions of me with long, flowing tresses like the hip-shaking heroines of the Bollywood movies he loved to watch.  He was forever making remarks that he found funny but I found annoying, encouraging me to “grow it out!” and “not so short!”  But to my surprise and perhaps disappointment, he handled my shaved head remarkably well, voicing no critiques and even silencing my mother who clearly thought I had lost my mind.

Though I never shaved it again–

a) I’m not cut out to live a renegade lifestyle

b) my head is oddly shaped

c) lack of hair dampened my flirting potential, which truly affected my quality of life

–once my hair grew back, I continued to style it short.  I had no reason to wear it longer and plenty of reasons to keep it cropped: I lived in hot climates (Memphis, then Houston, then Tucson), I like a low-maintenance morning routine, I had been told once or twice that I looked like the Indian Halle Berry.  Why mess with a good thing?

In my first semester of graduate school, my parents proposed a trip to India for my cousin’s wedding.  She was three years my junior and had become engaged to a man that she met herself at another family wedding and secretly “dated” before coming home and suggesting to her parents that he might be a good match for her.  I rather liked this schema: it was spunky and made the prospect of braving a wedding (at which I would be the noticeably older, unmarried, American cousin) far more palatable.  Not to mention, I had not been to India, the country of my parents’ birth, in over a decade, and my father and I had only traveled there together once before, when I was an infant.

A few months before we were scheduled to leave for India, my father asked me to grow out my hair.

“Nito,” he said, after he had so cleverly taken me out to lunch in Memphis, plied me with pulled pork barbecue and worked me into quite the food coma, “What if you grew your hair for a little while?  Please don’t cut it before we go to India.  It will just look better, your relatives will like to see it, not so short.”

I knew that my relatives weren’t the only ones who would like to see my hair “not so short,” but refrained from saying so.

“But doesn’t the nose ring count for anything?” I asked him, mostly teasing since I had pierced it on a whim in college, not out of any deep-seated cultural agenda.

“Maybe a five-point bonus,” he said, keeping the joke.  “But your hair could look so nice!”

He said “could,” as in “doesn’t right now,” which I noticed but also choose to ignore.  Instead, I decided to leave my hair untouched.  After all, I had cut it for no particular reason, surely I could grow it out when it meant so much to my father?

“I’m going to cut it as soon as we get back, though, okay?”

“Okay,” he consented.  “It’s your hair.”


My father died six weeks after we returned from India.  Except for the occasional trim, I haven’t cut my hair since.  I grow my hair for a dead man who carried his hair on his arms and his legs and his chest and his back, but not his head, curling and dark. He would be so pleased if he could see this hair.  This hair, my hair, all the way down my back, long and flowing the way he always wanted.

Tomorrow, I’m having my first hair cut in nearly four years.  Not an arbitrary cut, but one that will help mark my twenty-seventh birthday and which will result in an envelope full of my hair being mailed here.  You see, my friend Rebecca and I have many things in common: we’re giant nerds, know more Disney song lyrics than we really ought to admit, have serious sweet tooths, and love to craft things with our hands.  But the most powerful thing we share is the one we never counted on; losing a parent within nine months of each other.

Rebecca’s mom Karen fought an exhausting battle against cancer for two-and-a-half years, one of those terrifying up-and-down rides full of uncertainty and pain, loss and hope.  My friend put her life on hold to tend her mother’s every need, exhibiting the kind of courage and relentlessness that humbles one who witnesses it.  By the time Karen was diagnosed, right in the middle of our senior year of college, Rebecca had become my family and I, part of hers.  My own father’s death very surprisingly interrupted the trajectory of things; who could have guessed that I would be the one to lose a parent first?

To this day it stuns me, how in the midst of their own sadness and grief, Rebecca and her parents tended to me so unselfishly.  I remember spending part of an afternoon at the hospital with them, not long after my father had died and during a time along the cancer roller-coaster when chemo had stripped Karen’s head completely clean of hair.  She had wigs, but they didn’t come close to recreating her.  The most realistic ones are, of course, the most expensive.

“Your hair is so beautiful, Nishta,” she told me, in a voice I’ll always be able to hear.  “I wish I could wear it.”

“I’ll grow it out for you,” I told her.  “I promise.”

Tomorrow I’ll be making good on my promise at the same time I let go of the hair that feels so connected to my father.  I’m nervous, excited, and proud, and I promise to post some before-and-after pictures on Friday, provided that I don’t become totally incapacitated by all of the food I’m planning to eat between now and then (with a birthday today & Thanksgiving tomorrow, let’s hope I can even fit into my pants on Friday!)

I’m wishing all of you very festive and delicious Thanksgivings, full of people you love and lots of linger-worthy moments.

KAREN’S MEXICAN RICE & “GRAD SCHOOL” BLACK BEANS

Rebecca’s mama made the world’s best home-cooked Mexican rice, and she generously passed on her secret to me through her daughter: 1 ¾ cups liquid for every 1 cup of rice. Her ratio yields flavorful rice with the ideal texture and every time I make it (which is often), I picture her in my kitchen, proud that I’m working her recipe.

This rice makes an excellent accompaniment to so many things, but my favorite pairing is with a big pot of simple, vegetable-laced black beans.  “Grad school food,” I call it, given how cheap it is to make, while at the same time being comforting and tasty.  Feel free to swap in or out other vegetables such as chayote, fresh spinach, mushrooms, etc.

KAREN’S MEXICAN RICE

1 cup long-grain rice
1 ¾ cups vegetable or chicken broth
2 cloves garlic, thinly sliced
3 medium ripe tomatoes, diced or 1 can diced tomatoes, drained
1 T cumin
½ T chili powder
salt
vegetable oil

optional: sliced onion

In a large skillet with a fitted lid, sauté the garlic (plus onion, if you’re using it) in a few tablespoons of vegetable oil over medium heat.  After two minutes, up the heat to medium-high and add the rice, toasting in the oil until the rice begins to brown and become fragrant, about 5 minutes.

Pour in the chicken or vegetable broth, then stir in the spices.  Cover the mixture with the lid and allow it to come to a boil.  Once the mixture boils, dial back he heat to medium-low, stirring periodically until the liquid is nearly gone and the rice is fully cooked.

Toss in the tomatoes and check the rice for salt, seasoning to your liking before serving hot.

“GRAD SCHOOL” BLACK BEANS

2 cans black beans, fully or partially drained*
1 can corn (or 2 ears’ worth of fresh corn, off the cob)
2 carrots, peeled & sliced ½-inch thick
1 red bell pepper, seeded & diced
1 ½ T cumin
1 T garlic powder
1 tsp. salt
vegetable oil

optional: ½ or a whole jalapeño, minced
potential garnishes: grated cheese, sour cream, cilantro, salsa, raw onion, shredded cabbage

In a medium-sized saucepan over medium heat, sauté the bell peppers (jalapeño, if you’re using it) and carrots in a bit of vegetable oil until soft.  Add the black beans, corn, & spices, then mix well.

Cover and turn down the heat to low.  After 10-12 minutes, the beans should be heated through.  Check for salt, then serve over rice.

*If you want drier beans, drain all the way.  For a soupier effect, drain only one of the two cans.

Share/Save/Bookmark