Category Archives: Meat

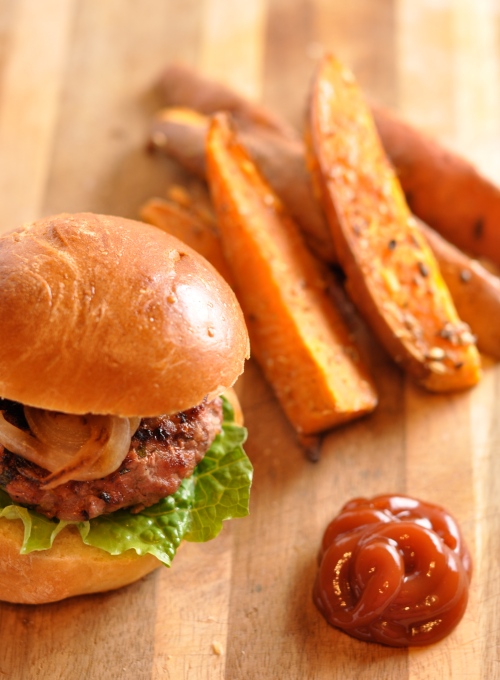
BURGERS & FRIES

Remember last week’s guest posts from Jessie about baking bread?  And remember when I told you that half of my batch of challah found its destiny in the form of some tasty, tasty hamburger buns?

Now I’m not trying to tell you how to live your life, but there are few better ways to enjoy the changing season than home-cooked burgers and fries.  Burgers and fries, burgers and fries.  Have two things ever gone so well together?  Even their names have a kind of lulling rhythmic rightness: burgers and fries, burgers and fries.

There are approximately three zillion recipes out there for “the perfect burger,” “the diet burger,” “the California burger,” “the ultimate burger,” etc.  I’m not claiming this burger is any of the above, but it did make for a very satisfying Saturday night dinner.

BURGERS & FRIES

I will also say that I believe the quality of the ground beef I used had everything to do with how good these burgers tasted.  Jill and I purchase a meat share from a local farm here in Texas, and not only do we feel ethically good about supporting a small operation with well-treated animals, the meat just plain tastes better.  Like, light-years better.

And so if you haven’t, I urge you to check into and support small farms in your area.  You can search here or stop by your local Farmers Market.

for the burgers:

2 lb. ground beef
1 red onion
1 cup cheese of your choice (we used double Gloucester)
½ cup flat-leaf parsley
juice from half a lemon
salt & pepper (more of the latter than the former)

Peel & dice the onion, then sauté in a little olive oil until soft & translucent.  Set the onion aside to cool and in the meantime, grate the cheese & chop the parsley.

Combine all ingredients in a large bowl, mixing well with your fingers.  Form into patties of your desired size, keeping in mind that burgers shrink significantly when cooked.  I usually make my patties very round & tall so that they’ll even out by the time they arrive on a bun.

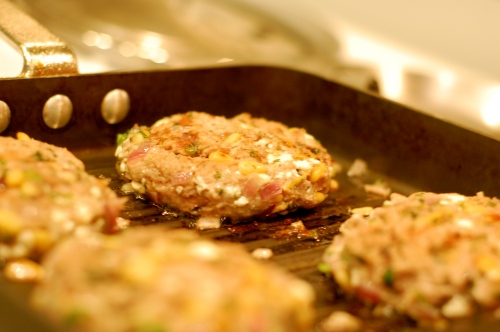
Grill outside or indoors on a grill pan/stovetop grill.  (You can also refrigerate pre-made patties ahead of time or flash-freeze on a cookie sheet first, transferring them to a freezer bag for future use.)

For an especially tasty burger, brush your buns with a little melted butter & add them to the grill for the last few minutes of cooking.  Garnish burgers with desired condiments: grilled onion, avocado, tomato, lettuce, pickle, Dijon mustard, mayonnaise, etc.

for the fries (adapted from Gourmet):

2 lb. sweet potatoes
1 tsp. whole coriander
½ tsp. fennel seeds
½ tsp. dried oregano
¼ tsp. red pepper flakes
salt
vegetable oil

oven: 425°

Cut the sweet potatoes into wedges—peeling them is not necessary.  Grind the spices together with a mortar & pestle or spice grinder (the latter will, of course, result in a much finer grind).  Place the potatoes in a large roasting pan; use two if need be, you don’t want to crowd the slices because they won’t crisp up.

Toss the potatoes with a few tablespoons of oil to coat, then add the spices, distributing evenly.  Roast for 40-45 minutes, turning the wedges halfway through and rotating the pans if you used two.

Sprinkle generously with salt before serving.  They are delicious plain, with ketchup, Sriacha, or this tamarind chutney.

SPAGHETTI CARBONARA

This weekend I watched my best friend eulogize his sister.  I watched his sister’s widower, who is thirty-one, eulogize his wife, telling the sweet story of how they met as undergraduates at Rice, their first date an Old 97s concert, their sixth anniversary just a few months ago, just a week or so before she died in the midst of an earthquake in Haiti.

The same week that Dave flew home to begin the long vigil of waiting for news of his sister, my dear friend Wayne sat in an ICU waiting room night after night, keeping company and logging time as his mother recovered from emergency brain surgery to remove a cancerous mass.

Today I spoke to Wayne on the phone—his mother is doing well, feeling strong and working her way through chemo and radiation—but Wayne’s fiancée Elizabeth, if you can believe it, has been diagnosed with a brain tumor of her own.  It woke them both up a few nights ago, Elizabeth gripped by a seizure, her body revealing its secret.

Understanding isn’t welcome here, friends.  Answers, even if we had them, would do no good.  The rain falls on the just and unjust alike, moral indignance to the contrary be damned.  If anything, what we can cling to is our insistence on aliveness, the instantaneous dose of perspective such news brings, like my realization that most of what’s on my to-do list is useless; my list of complaints and grudges, bullshit.  I know it shouldn’t take catastrophe to get me to pause, to “what the hell” and toss out my agenda in favor of face-to-face time with the people I love, but all too often, it does.

I sat across from Dave tonight, espresso cups balanced on a rickety table between us, as we have done so many times before in our decade of friendship.  Of course, everything has changed now, inextricably and irreparably and inexplicably.  I make mix CDs and I hug him tight and try not to say anything idiotic, hope furiously that loving someone as much as I love him counts for something in this long-run weigh-in with grief.

SPAGHETTI CARBONARA

Something about this dish screams “carpe diem” to me, perhaps because it’s so decadent without being fussy, comforting and dead satisfying.  It’s the kind of thing you make when you’ve abandoned any healthy pretenses and instead decide to serve up a bowl of something unguent, tangled mess of joie de vivre.

Disclaimer: this is not a strictly authentic version of carbonara, and I know that.  It is, however, a much less cluttered version than many you’ll find out there.  To strip down further, omit the parsley and use guanciale instead of panchetta, splurge on fresh pasta.

ingredients:

1 lb. linguini or spaghetti
¼ lb. pancetta, roughly chopped
3 eggs
3 cloves garlic, crushed & minced with a little salt
¾ cup Parmesan or Pecorino Romano
¼ cup dry white wine
½ tsp. red pepper flakes
black pepper
olive oil

optional garnish: chopped flat-leaf parsley

First things first—get the pasta going.  Cook it as you normally would, but be sure to save about a ¼ cup of the cooking liquid when draining the noodles.

In the meantime, heat a little olive oil over high heat, then add the chopped pancetta and cook until it begins to brown.  When it does, turn down the heat to medium and add the garlic.  After about 5 minutes, your kitchen should be nice and fragrant.  Pour in the wine and let it cook down, another 5 minutes.

Sprinkle the red pepper flakes atop the garlic-panchetta brew.  In a separate bowl, crack and gently beat the eggs.  Add in the pasta water and beat further—this is to temper the eggs and keep them from scrambling when you add them to the hot pan, which you are about to do.

Bring everything together: remove the pan from heat, then add the drained pasta.  Pour the egg mixture over everything, tossing rapidly to coat.  Sprinkle on your cheese and grind in a generous helping of pepper, then mix again.

Serve hot, with parsley and a little extra cheese as garnish, if you wish.

Share/Save/Bookmark

THE FOOD OF MY PEOPLE: LAMB KOFTA

One of the hardest things about losing my dad is that there are just so many things I’d like to cook for him.

After a certain passage of time, the distinguishable presence of a loved one begins to fade—the distinct quality of their voice, the shape of their face in three dimensions, the particular quirks and habits.  It becomes more difficult to guess what they might have said in a particular situation, how they would react to a comment or a joke, what books you might recommend to them now, or what movies you would take them to.  I find it terrifying, in fact, the way passage of time seems to make it increasingly difficult for me to conjure up my father the way he was, the way he might be now.

Difficult, too, because the more time that goes by, the more different I am, perhaps unrecognizable to him.  My dad died before I earned a Masters degree, before I got my first full-time job, before I bought myself a car and did my own taxes and grew my hair out long and then cut it again.

I hate that he has missed all of this, and I have missed him in it.  I have wondered, doubted, that I might be forgetting him, losing him.

But the one place I still feel certain of him is in the kitchen.  I know, instinctively, the dishes he would want, the moment he would sneak a warm treat from the oven, the recipes that would dazzle him and make him proud.  This is one of them.

LAMB KOFTA

This dish is rich, satisfying, and incredibly flavorful.  It also freezes well, so feel free to make a big batch!

meatballs:

1 lb. ground lamb
½ basin (chickpea flour)
½ cup crumbled paneer*
¼ cup cilantro, roughly chopped
½ onion, diced
3 cloves garlic, minced
2 T garam masala
2 tsp. ground coriander
2 tsp. cumin
½ tsp. red mirchi (pepper)

Sauté the onion & garlic in a bit of vegetable oil until soft.  Once they cool, toss them into a big bowl with the rest of the meatball ingredients.

Using your hands, form meatballs about an inch in diameter.  (I like to keep them on a sheet pan until they’re all ready.)  Once you’re ready, heat a cup of vegetable oil in a deep saucepan over medium-high heat.  Fry the meatballs until light brown, approximately four minutes on each side.

If you want to freeze or keep the meatballs separate from the gravy, you can finish them in a 350˚ oven, which should take only 10-12 minutes.  If you’re planning to serve them, just keep them to the side or in a low oven while you make the gravy.

gravy:
2 large (28 oz.) cans diced tomatoes
1 pint sour cream
½ cup whole almonds
½ large red onion, sliced
3 T ginger, chopped
3 T garlic, chopped
2 tsp. whole cumin
2 tsp. whole coriander

In a large, heavy bottomed pot, heat a quarter cup of vegetable oil over medium-low heat until it shimmers.  Add the cumin and wait for it to crack before tossing in the garlic, ginger, & onion.  Cook for a few minutes, then add the almonds and whole coriander.

Cook it all down until soft, and the onions are translucent, adding more oil during the cooking if necessary.  This whole process will take about fifteen minutes.

Toss in the tomatoes and stir everything together.  If you have an immersion blender, go ahead and put it to work.  If you’re using a conventional blender, allow the mixture to cool before blending it in batches.  Process until the mixture has reached your desired texture (I like mine a little bit chunky).

Add the sour sour cream to the gravy, mixing thoroughly until it turns light pink.  Reheat the gravy over medium heat until bubbling—be sure to stir regularly so it doesn’t stick to the bottom.  Add the partially cooked meatballs to the gravy and let them finish cooking there.

Serve over basmati rice, garnish with cilantro.

*Many of you may be able to buy paneer, which is a mild Indian cheese, at a specialty grocery store.  If not, you can make your own (it’s actually very easy!) or substitute a similar soft, mild cheese: farmer’s cheese, queso fresco, or a ricotta.  If you’re using ricotta, which can sometimes be watery, squeeze it out in a cheesecloth first.

Share/Save/Bookmark

GAME DAY CHILI

Every once in a while, we human beings are bold enough to take an idea, a possibility, a “what if” or a “hmm, could we?” and allow it to germinate in our mind, to take us over, to use us and pull us into creation mode.  Then, if we’re crazy enough, we begin to speak our idea aloud—we tell other people, they tell other people.  And before we know it, we are wed to the thing, we are given by it, we find ourselves sitting at the kitchen table (right, Julie?) in our pajamas, working and working but the work almost doesn’t feel like work.  Or at the very least it feels like the right kind of work to be doing.

For me, I find it’s all too easy to watch the news, to read the paper, to look at the world and think “I wish I could help,” to feel deeply for the suffering of others and then put that all aside and move on.  But not Julie van Rosendaal.  She created something, a beautiful something, something I am very proud to be a part of:

Inside this cookbook, you’ll find recipes and gorgeous photographs from some of the best chefs and bloggers on the internet, a group in which I’m honored to be included.  While the book was put together in record time (just under three weeks!), it’s lost absolutely nothing in terms of quality.  Preview a handful of the pages online; they’re gorgeous.

You can purchase the soft cover edition for $25, the hardcover for $50.  Every penny raised from sales will go straight to earthquake relief efforts in Haiti, via the Canadian Red Cross & Doctors Without Borders.

I think the Blog Aid cookbook would make a great birthday, housewarming, wedding, Mother’s or Father’s Day gift.  Or just buy it as a statement of faith, a vote on the side of hope and good work, a testament to the fact that one woman’s idea can become food in a child’s mouth, medicine for a wounded man, glossy cookbook pages you hold in your hand.

GAME-DAY CHILI (among other Superbowl food ideas)

I hardly ever make chili the same way twice—depending upon what’s in my pantry, spice cabinet, freezer, & fridge, all kinds of meats and seasonings have made their way into the pot.  Don’t be afraid to mix meats—pork, venison, beef—and change up the type of beans you use (if you use beans at all).  If you have a crock pot or slow cooker, now is the time to drag it out!  It serves perfectly for chili-making.  Don’t worry if you don’t have one, though, you can still brew up some perfectly good chili the old-fashioned, stovetop way.

Every chili has some “signature moves”—mine are dark beer, cinnamon, & a little cocoa powder.  All three of these do a little something to the flavor…you can’t pinpoint what you’re tasting, but it tastes good.  Mushrooms may seem like a strange ingredient, but they bump up the “meatiness” quotient of the chili without you actually having to add meat at all.  Control the heat to match your own preference, and bear in mind that big pots of chili usually get hotter after a day or two in the fridge!

ingredients:

2 lb. ground sirloin

1 cup chopped crimini or white mushrooms

1 onion, diced

3 carrots

3-4 cloves garlic, minced

1 serrano or 2 minced jalapeño peppers (if you like/can handle the heat!)

4 T chili powder

1 T cocoa powder

1 tsp. chipotle chili powder

1 tsp. allspice

1 tsp. cumin

1 tsp. salt

½ tsp. cayenne pepper

½ tsp. cinnamon

4 cups beef stock

1 dark beer (I used Negra Modelo)

1 28-oz. can fire-roasted, crushed tomatoes

2 14-oz cans kidney beans (but only if their presence won’t offend your sensibilities)

2 T Worcestershire sauce

2 T chipotle peppers in adobo sauce

1 dried ancho chile (you could certainly use another type)

a few dashes of liquid smoke

vegetable oil

potential accompaniments: white rice, spaghetti, tortilla chips, Fritos, cornbread, cheddar cheese, sour cream, scallions

Mix all of the spices in a small bowl.  Bring a large, heavy-bottomed saucepan over medium-high heat, then  brown the meat, in batches if necessary.  As you cook the meat, add in some of the spice mixture to each batch.

Once the meat has browned, transfer to a crock pot or large, heat-proof bowl.  Drain most but not all of the accumulated fat—swirl in a little vegetable oil, then sauté the onions and garlic for a 3-4 minutes before adding the carrots & mushrooms.

If using a crock pot or slow cooker, once the vegetables are soft, add them to the beef.  Pour in all of the remaining ingredients and cover, cooking for full cycle or at least two hours before serving.  Check for spices & salt.

If cooking on the stove, return the meat to the pot and add the remaining ingredients.  Bring to a boil, then simmer for at least an hour before serving.  Check for spices & salt.

Share/Save/Bookmark

SPAGHETTI & MEATBALLS

It’s always a good idea to revisit a classic.


My students and I are finishing up our unit on To Kill a Mockingbird this week and I’m breathing a huge sigh of relief.  I was so hesitant to teach this text—some of you know that I switched from sixth to eighth grade English for this year—because I just didn’t know if I could do it justice.  Never have I been asked to teach a book I hold so close to my heart, and I was scared.

I read To Kill a Mockingbird for the first time in the seventh grade.  My teacher, Mrs. Zehring, was a goddess whom we all worshipped; we were captivated by her, and so then by extension, the book.  I’ll never forget the afternoons sitting in that classroom, listening to her read passages from the book aloud in her lilting Southern accent.  The intensity of the storylines surrounding Boo Radley and Tom Robinson, the innocence and feistiness of Scout, the quiet and courageous dignity of Atticus—all of it made a profound impact on me.

Since then, I have read To Kill a Mockingbird many times, marveling in the adept writing, haunted by the timelessness of the social commentary, being ever moved to tears at the end.  What if I couldn’t convey all of this to my students?  What if they didn’t “get it?”  What if I became unfairly frustrated with them because I was so attached to the book?


I needn’t have been so worried.  Coming to the book as a teacher has only deepened my respect for and awe over its power, especially as I’ve watched my students go from skeptical (“It’s so confusing!”) to interested (“Okay, it got kinda good.”) to deeply impacted (“OMG, I cried!”).  And, of course, they have shown me facets of the book that feel new, energizing.  They have renewed my faith that classic literature really is classic—that it can still be read and cherished in a Lady Gaga, podcast kind of world.

For a dinner classic, I urge you to revisit spaghetti & meatballs.  If nothing else, the basic marinara sauce is worth getting under your belt.  The meatballs, while time consuming, are crazy-delicious.  Lighter and more flavorful than the ones you might have grown up eating, these still satisfy that “bowl o comfort” craving at the end of the day.


SPAGHETTI & MEATBALLS

My philosophy is that if I’m going to go through the trouble to make homemade marinara sauce and meatballs, I’d might as well make a bunch of both.  The sauce freezes so well, and on a night when you really need it, will help you answer the inevitable “What are we having for dinner?” Think: pasta, pizza, chili.

You can also freeze the meatballs, of course, either on their own or in the sauce.  But don’t feel limited to serving the two together—the meatballs will work just as well on a sandwich or you can toss them into all kinds of soups.

This recipe is very forgiving, so feel free to improvise as you see fit.

for the marinara
:

2 large yellow onions, diced
6-8 cloves garlic, minced (may sound like a lot, but I promise it mellows)
½ cup red or dry white wine
3 (28 oz. each) cans whole tomatoes
¼ cup tomato paste
¼ cup balsamic vinegar
1 T dried oregano
1 tsp. crushed red pepper
olive oil
salt & pepper

optional: fresh basil, to finish

In a large, heavy-bottomed pot, heat 3-4 tablespoons olive oil over medium heat.  Add the onions and cook 1-2 minutes before adding the garlic.  Cook together until translucent and soft, 8-10 minutes more.

Crank up the heat to medium-high and pour in the wine.  Reduce that mixture down until it’s thick and syrupy.  Now it’s time to toss everything else in: the tomatoes, tomato paste, balsamic, oregano, & crushed red pepper.

Allow the sauce to heat up until it’s bubbling, then turn down heat and simmer the marinara for at least 45 minutes, preferably an hour or two.   Serve as-is OR add meatballs to heat through (see below) OR cool and freeze the sauce for later use.


for the meatballs:

2 lbs. ground meat*
1 medium onion, diced
3 cloves garlic, minced
¾ cup day-old bread, preferably white or an Italian-style loaf
approx. 1 cup milk, preferably 2% or whole
½ cup grated Parmesan cheese
½ cup parsley, roughly chopped
1 tsp. lemon zest
salt & pepper
olive oil
vegetable oil

Sauté the onion & garlic in a small skillet with olive oil over medium heat until soft and translucent (sensing a theme here?).  Set aside to cool.

Tear or chop the bread into small pieces, then pour milk over the bread, enough to cover all of the pieces.  Let sit for five minutes, then remove the bread, squeezing out any excess milk.   Trust me on this, okay?

Add the milk-soaked bread to a large bowl, along with the cooled onion & garlic, parsley, lemon zest, and generous amounts of salt & pepper.  Using your hands (really, you must, and it’s so much fun anyway!), mix everything thoroughly.

Again, using your hands, shape the meat mixture into meatballs of the size you prefer—I like mine with a 1 to 1 ½ inch diameter—and line them up on baking sheets.

I use a deep, very heavy-bottomed saucepan for meatball-cooking purposes, and an oil ratio of 3 parts olive oil to 1 part vegetable oil.  The oil needs to get rather hot (not quite to smoking) and I recommend you wear long sleeves when you do this—safety first!

Cook the meatballs in small batches—don’t crowd!  Brown the meatballs on all sides (remember, you’re not cooking them through) and then return them to a clean baking sheet.  Depending on the size of your pan, each batch will take 8-12 minutes.

To finish the meatballs, you have a couple of options: toss them in the hot marinara sauce and let them simmer for about twenty minutes, or do the same with hot soup broth.  Otherwise, the meatballs can finish cooking in a 350˚ degree oven, 12-15 minutes if smaller, 15-20 if bigger.

Cool the meatballs thoroughly before freezing OR cook up some pasta and bust out the Parmesan.

*I have used all combinations of meats with great success: all ground beef, half beef/half pork, half beef/half ground turkey, all turkey.

TAKING STOCK & MAKING SOUP

Around here we say, “unfussy food from a fun-loving kitchen.”*  Essentially, what that means to me is you can make great food at home without slaving away for hours or blowing your budget on fancy ingredients.  The kitchen is a place where we should all feel free to make mistakes and make a mess, to play and focus, to relax and to express.  If it isn’t fun, or at the very least rewarding, we won’t do it.

To me, there’s no inherent virtue in fussy.  You know, three different curlique garnishes, half-a-dozen specialty ingredients, recipes that could fill a dishwasher with bowls and dishes just from the prep work?  I don’t do fussy for fussy’s sake.  But if the fuss is going to get me something, like crave-able onion rings,  light, buttery popovers, or delicate almond cookies sandwiched with jam and chocolate, then I’m totally in.

I first tried making my own stocks and broths in graduate school because I was on a serious budget, and it was the frugal thing to do.  Of course, I knew somewhere in the back of my mind that once I started making my own versions, I wouldn’t be able to buy the pre-packaged stuff anymore.  Hours of slow-simmered goodness from your own stove, it’ll spoil you.

It’ll also make you feel worthy of your grandmother or [insert personal kitchen icon here].  Making homemade stock, which you can then use in homemade soups and stews, is the ultimate I CAN DO THIS moment.  Make your own stock and see if you don’t feel like a bona fide, authentic, oh-so-capable blue jean gourmet!

Oh, and have I mentioned how easy it is?  All you really need is an extended period of time at home so you can let the stock simmer and check on it from time to time.  Four to six hours later, you’ll have a house that smells like heaven (warning: this can drive dogs craaaaaazy) and stock that’s richer and more flavorful than anything you can buy in a box or a can.

Of course, if you give a mouse a cookie, he’s going to want some milk to go along with it, and if you decide to make stock, you’re going to want to cook with at least some of it ASAP (freezing the rest for future use, of course).  So I’m including an easy, hearty dinner soup recipe that will serve your new stock well.

Should you wish to go all the way with the “fussy but it’s worth it” theme, might I suggest you tackle the infamous Boeuf Bourguignon?  Made famous by the fabulous Julia Child and then re-famous by Julie & Julia fever this year, it really is something you ought to make at least ONCE in your culinary lifetime.  I made some this summer for Jill when I discovered she’d never had it.  She’s still raving about it, I tell you.

More interested in chicken, chicken stock, & chicken soup?  Don’t worry, we gotcha covered.

*Coming soon to a kitchen apron near you!  Yes, really.  Stay tuned.

BEEF STOCK

To make your own beef stock, you can simply buy soup bones from a butcher or save the bones from roasts & steaks as you cook.  If you are working with bones that have already been cooked, you can use a stovetop method: simply sauté all of the same vegetables listed below in a stock pot with some olive oil until soft & fragrant.  Then add the water, bones, & seasonings.

4 lb. beef soup bones (uncooked)
2 red onions, quartered
3 carrots, chunked
3 ribs celery, chunked
3-4 garlic cloves, peeled & smashed
2 T tomato paste
1-2 bay leaves
fresh thyme or rosemary
salt & pepper

optional: splash of red wine
oven: 450˚

Place the vegetables on the bottom of a large roasting pan.  Drizzle with olive oil, then place the soup bones on top.  Season everything liberally with salt & pepper.

Roast in the oven for 25-30 minutes, then transfer the contents of the roasting pan (plus any delicious, accumulated juices) to a large stock pot.  Fill the pot with as much water is needed to cover everything, somewhere around 8 cups.

Toss in the herbs, tomato paste, & red wine (if using).  Bring the mixture up to a boil, skimming off any foam that initially rises to the top.  then let the stock simmer gently for at least four hours, allowing it to reduce.

Taste-test the stock before deciding it’s through.  When you’re ready, strain the stock & save the meat from the soup bones for your dog or another purpose.

If you wish to skim the fat from your stock, the easiest way to do so is to refrigerate the finished stock in a large plastic container.  When it’s nice and cool, the fat solids will rise to the top, making them easier to removed.

Me personally?  I like fat.  It tastes delicious.

Once thoroughly cooled, beef stock will keep well in the freezer for several months.

ITALIAN SAUSAGE SOUP

Inspiration for this soup comes from Jill’s mother—my version is a bit different, but like hers, it’s hearty, easy to make, & goes wonderfully with a pan of cornbread or sliced loaf of crusty bread.  Like most soups, this one just gets better after a few days in the refrigerator!

The more flavorful the sausage, the more flavorful the soup.  Splurge, if you can, on well-crafted product, preferably fresh sausage from a grocery counter (as opposed to something frozen or packaged wholesale).  A tip—if you are a fan of parmesan cheese, save the rind!  I always add them to my soups, especially this one, and they impart excellent flavor.

6 cups beef stock
1 lb. Italian Sausage (hot or mild—the choice is yours!)
1 onion, sliced
2-3 cloves garlic
2 bunches fresh or 1 package frozen spinach
2 cans chickpeas, drained
fresh (1 T each) or dried (1 tsp. each) basil & oregano
olive oil
salt & pepper (1 tsp. each)

Slice or crumble the sausage into a tall, heavy-bottomed pot.  Turn heat to medium and brown the sausage, in two batches if necessary.  Transfer the browned sausage to a bowl with a slotted spoon.

Without cleaning the pot, add a bit of olive oil and cook the onions and garlic until translucent.  If you’re using frozen spinach, you’ll need to thaw & drain it while the onions cook.  If you’re using fresh, wash & dry it well before adding it to the onions & garlic, allowing the leaves to cook down quite a bit.

At this point, return the sausage to the pot along with the rest of the ingredients: stock, chickpeas, herbs, salt, pepper, & frozen spinach (if using).  Bring the soup to a boil, then simmer on low heat for at least thirty minutes before checking for flavor and adjusting salt, if necessary.

Serve hot.  Feel free to grate some parmesan on top—but only if you want to.

Share/Save/Bookmark

CONSIDER THE CHICKEN

Oh humble chicken, you have been much-abused.  Penned-in, overfed, packaged on sterile Styrofoam and pumped full of watery broth, deboned, all-too-often rendered dry and tasteless.

It doesn’t have to be that way, of course.

roast chicken

Out of a whole set of reasons which are probably suited for a separate blog post, Jill and I made the decision over a year ago to stop buying conventionally raised & processed meats.  I could say a lot, lot more about how and why we did this and how glad I am that we did, but for now I’ll just stick with: I’ll be damned if the chicken sure doesn’t taste a heckuva lot better.  You know, like food you’d actually want to eat.

I also find it brings great satisfaction to use the bird in its entirety, from neck to wingtip. It’s what your grandma—well not my grandma, but someone’s grandma—would do.  I want to be that grandma in the kitchen: thorough, efficient, capable, fearless.

So let’s reclaim the chicken in all of its juicy, satisfying glory!  It’s amazing how well you can feed yourself and, if applicable, your family, with one respectfully-treated bird.

Today’s somewhat complicated post proceeds as follows:

Roast a chicken
Make chicken salad out of leftover breast meat
Make chicken stock using the carcass
Make chicken soup with the stock & any remaining chicken meat

{Repeat}

You don’t have to go through all of these steps, of course; you can easily make the chicken salad or soup with a store-bought rotisserie chicken.  But I hope at some point you will take a second look at the humble chicken, perhaps splurge on a free-range version, and spend some time in your kitchen with her, for she is so much more than the zebra-striped grilled breasts she’s so cruelly reduced to.

ROAST CHICKEN

Okay.  There are lots of fancy recommendations out there about tucking slivers of garlic under the skin or mixing up ten-ingredient spice rubs with which to coat the entire bird, and you can do all of that, I am not going to stop you.

But promise me you’ll try, at least once, the almost sinful simplicity and ease of  roasting a chicken practically naked.  Planning to eat it for dinner?  Roast some potatoes and parsnips (drizzled in olive oil, seasoned with salt & pepper) underneath.  Planning to reserve the meat for later?  Roast carrots, onions, a few cloves of garlic, & celery underneath to transfer directly into a stock pan.

Take the chicken out of the refrigerator about an hour before you plan to cook it.  Preheat your oven to 450°.

Using paper towels, dry the chicken extremely well, inside and out.  Cover the skin liberally with salt (kosher, if possible) & pepper.  You may stuff the breast with herbs like rosemary, sage, thyme, etc. and/or half of a lemon.

I like to roast my chicken this way: in the roasting pan go the potatoes and veggies.  On top of those, I set a small rack (the same kind I use for cooling baked goods), and on top of that, I set the chicken.  This allows for more even cooking than if the chicken sits directly on top of the vegetables.

You can truss the chicken, as you see I did here, but honestly I’ve roasted without and just don’t think it’s necessary.  Roast the chicken, breast side up, for 45 minutes to an hour, depending upon the size of your bird.

Make sure you let the bird rest for 10-15 minutes before cutting into it.  Divide the bird into breasts, legs, & wings, but watch out for eager kitchen visitors trying to snatch bites from over your shoulder (ahem, cough, Jill, cough cough).

CURRY CHICKEN SALAD

My version of the classic.  You’ll see I like my chicken salad chunky, but feel free to chop everything into smaller pieces if you prefer.  Tastes even better the next day.

chicken salad sandwich
ingredients:

2 cups cooked chicken breast meat, chopped
1 apple, peeled, cored, & small-diced (I used a McIntosh)
1 rib celery, small-diced
½ cup pecans, toasted & chopped
¼ cup red onion, small-diced

1 cup mayonnaise
½ cup Dijon mustard
1 tsp. curry powder
splash of white wine vinegar or lemon juice
salt & pepper to taste

Combine all ingredients.  Serve on toasted bread or, if you must, lettuce.

HOMEMADE CHICKEN STOCK

Just as with roasting a chicken, there’s no one way to make chicken stock.  If you do make it at home, though, I swear on my Kitchen Aid mixer that it will be about 8 million times better than the stuff you can buy at the store.

Time is your friend when making chicken stock, so you can’t be in a rush.  I find that a minimum of 3-4 hours are required for a concentrated, brightly-hued batch.

chicken stock on the stove

ingredients:

chicken carcass
2 onions
3 carrots
3 ribs celery
2-3 cloves garlic
fresh thyme
2 bay leaves
splash of vinegar
salt & pepper

optional: white wine

If you roast the vegetables with the chicken, you can cut everything into big pieces and transfer them directly to a large pot along with the chicken carcass when you’re ready to make stock.  Deglaze the roasting pan with white wine and then add that liquid to the pot as well.

If you’re making stock separately, dice the veggies and sweat them out in the stock pot first, with a little olive oil.  Once they’re translucent, add the chicken carcass and enough water to cover the whole mess.  Throw in the seasonings and a splash vinegar (said to help draw flavor out of the bones).

Bring to a boil and then simmer on low to medium heat, skimming the surface to remove any foam that appears in the first hour or so of cooking.  After that, keep an eye to see how the liquid is reducing down the side of the pot.  Once you can see a three-to-four-inch gap between where you started and where you are now, you’re in business.  Like I said, give it at least three hours.

Allow the mixture to cool a bit before removing the carcass with tongs and then straining the liquid through a sieve.  Discard vegetables and pick carcass clean of any extra meat bits.

Store the chicken stock in the refrigerator or freezer in an airtight container.  The fat solids will rise to the top upon cooling; if you like, you can remove them.  I don’t!


CHICKEN NOODLE SOUP

I made a noodle-less version of this soup for my friend Courtney a few weeks back, when she was feeling rather under-the-weather (see: germy students).  She texted me the next day to say “I’m healed!  And I’m pretty sure it was your soup that did it.”  Hey, maybe becoming that grandma after all!

Credit for this recipe goes to Chef Roger Elkhouri, who taught the only cooking class I’ve ever taken.  He was the head chef for my dorm in college and even though I hold him responsible for my Freshman 15 (it was bread and cakes for me, people, not beer!), he’s one of the kindest people I’ve ever met and a culinary hero still.

chicken noodle soup

ingredients:

1 yellow onion, diced
2 ribs celery, sliced thickly at a diagonal
2 carrots, peeled & sliced thickly at a diagonal
2-3 garlic cloves, minced
6 cups chicken stock
1 bay leaf
1 cinnamon stick
2 whole cloves
1 tsp. curry powder
½ tsp. nutmeg

2 cups cooked chicken, shredded
4 cups broad egg noodles, cooked

Cook the onion, celery, & carrots in the bottom of a soup pot in a little vegetable oil.  Add the garlic once the vegetables have begun to soften.  Once the mixture is translucent, add the stock and spices.

Bring the mixture to a boil, then simmer gently at least thirty minutes.  Add the chicken and egg noodles to warm through.  Remove bay leaf, cinnamon stick, & cloves before serving.

Share/Save/Bookmark

FEELIN’ KINDA SUNDAY: SPICY SHRIMP, TWO WAYS

First off, thanks so much to all of you for your love, sympathy, and good wishes.  It’s amazing how all of that feeling really does travel across space & time to make a difference.  I remember that sensation when my father died; it was as if I could literally reach out and touch the compassion being sent my way from people all over the world.  They were holding me up, buffering me.  Astonishing.

Ganesh

I know that there are much more dramatic, intense, & devastating events than the loss of an old dog; the world is full of so much sadness and hurt that if I think about it too much, it literally impairs my ability to function.  Behind every ambulance siren or news item is someone whose life is changing forever, someone whose idea of a live-able life looks, by necessity, drastically different from mine.

Life can be kind of terrifying, right?  Jill’s getting on a plane this afternoon to fly away to Egypt for a conference, and while I am terribly excited for her, in the moments I allow myself to imagine my life without her I am utterly broken open.  Someday, too, my mother will die and I just don’t know what to do about that.

I also know that it doesn’t do to dwell on these things.  A life of terror and worry is useful to no one and does nothing to thwart the inevitable.  But I do want to be mindful of the preciousness of my days, to balance being blithe and joyful with an ocean of earnest feeling.  I never want to forget that potent urgency I experienced after losing my father, the absolute necessity of living life in this moment instead of planning for “someday.”  For months, I walked around so mad I could spit to see all of these human beings wasting time as if they had time to waste.  The job they found unfulfilling, the relationship they refused to mend, the feelings they wouldn’t share, the project or plan or dream they kept putting off.

Last week, I went to see the Alley Theatre’s very fine production of Thornton Wilder’s American classic, Our Town.  Like many, I saw it first in high school.  Coming to it some ten years later allowed for a potency of reflection I wasn’t anticipating.  The quote my friend Marynelle wrote for me on her senior “goodbye” poster means much more to me now than it did then:

Emily: Do any human beings ever realize life while they live it?–every, every minute?
Stage Manager: No. The saints and poets, maybe–they do some.

While it may be somewhat impossible to get every, every minute, I’m working on more every day.  The lovely purple tulips on my desk, my students who make me laugh, my beloved who sings along to Chaka Khan in her big red truck, my dear friends who delight and care for me—all hang in the balance of what I love and what I’d miss (like Jill & her bff Bonnie):

Jill & Bonnie

Perhaps you are one of those people who revisit the same movie, book, or play every year or every couple of years.  I love the idea of coming back to words and scenes which stay constant while we change, measuring ourselves against them as a kind of yardstick.

Right now I’m planning a re-read of Somerset Maugham’s The Razor’s Edge, to see how/if it will move me, ten years later.  I return regularly to The Bhagavad Gita, of course, and The Tao Te Ching.  Other re-reads I’d like to take on include Little Women (Alcott), The Glass Bead Game (Hesse), & Crime and Punishment (Dostoevksy).

What about ya’ll?

Don’t worry, in all of this “deep” talk, I haven’t forgotten about the food!  Two spicy shrimp dishes here: the first is a favorite of my father’s, the latter certainly would have been, and both are excellent for football watching (Sonya & Jill tested them out a few weekends back).

CHIPOTLE BAKED SHRIMP
Adapted from Gourmet, August 2000

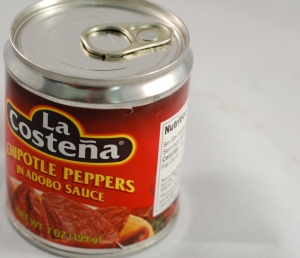
Look for smoky chipotles in adobo sauce on the International Foods aisle, with other Mexican condiments.  You won’t need a whole can, so buy a pork tenderloin while you’re at it for some really good sandwiches.

I’ve made this recipe both with the shells on and the shells off.  Tastes great either way, but shells on is more fun and also messy—you shell them as you eat, slurping up extra sauce.

ingredients:shrimps

1 ½ – 2 lb shrimp

½ stick unsalted butter

¼ cup dry white or red wine

1 ½ T Worcestershire sauce

half a can chipotles in adobo sauce, peppers minced

2 cloves garlic, minced

1 tsp. salt

must serve with: a baguette or other crusty bread, for sopping up sauce

oven: 400°

Melt butter in saucepan or microwave.  Add in the wine, Worcestershire sauce, chipotles & sauce, garlic, and salt. Toss the shrimp with sauce.

Bake the shrimp in a shallow dish for 10-12 minutes.  Serve in wide bowls with plenty of sauce & bread on the side.*

*If you like, you can remove the shrimp from the baking pan & reduce the sauce on the stove before serving.

BUFFALO GRILLED SHRIMP
Slightly adapted from Gourmet, July 2009

I’m not sure what more to say about this except that it’s really, really good.  And that you’ll need a lot of napkins.

For the dip:
½ cup sour cream (use half thick yogurt & half sour cream for a slightly healthier option)

½ cup crumbled blue cheese (I used a wonderfully pungent Maytag)

¼ cup chopped green onions

2 T finely chopped dill

juice of half a lemon

a little buttermilk or milk, to thin the dip (skip if you used the yogurt)

salt to taste

Stir together everything except the buttermilk/milk.  Then mix in a tablespoon or two until you reach your desired consistency.  Personally, I like my blue cheese dip really chunky.

For the shrimp: shrimp, celery, & blue cheese

1 ½ – 2 lbs shrimp, peeled & deveined
½ stick melted butter
¼ cup hot sauce *
olive oil

must serve with: many celery sticks!

I made the shrimp in a grill pan over medium-high heat, but the original recipe calls for an outdoor grill.  Oil either the pan or rack and then toss the shrimp with a little olive oil, salt, & pepper.

Grill until just cooked through, about 7-8 minutes depending on the heat of your grill.

Stir together butter and hot sauce in a large bowl. Add shrimp and toss until they are coated.

As official BJG taste-testers, Jill and Sonya suggest eating the shrimp plain and “chasing” them with celery dipped in the blue cheese dip.  This, they found, was more effective than trying to dip the shrimp themselves.

*We used Louisiana Hot Sauce, Gourmet recommends Frank’s RedHot.

Share/Save/Bookmark

MEXICAN-STYLE PORK TENDERLOIN SANDWICH

This may be my favorite sandwich of all time.

torta al pastor

I mean, come on.  Chipotle-and-honey-marinated pork tenderloin with spicy mayonnaise, melted cheese, pineapple, avocado, & cilantro clearly equals heaven.

Of course, I’m biased in favor of all things Mexican and Tex-Mex.  It’s in my blood.  My mother perfected the Blue Jean Gourmet margarita recipe while bartending in a Mexican restaurant in the seventies.  My father, who worked for that chain of Mexican restaurants, took the three of us on a Texas road-trip for research purposes when I was a pre-teen; we ate our way through Dallas, Houston, & San Antonio, consuming tortilla after tortilla, trying salsa after salsa, and the night we arrived home in Memphis, decided to make—you guessed it!—Mexican food for dinner.

Now I live in Houston, where I’m lucky to have the chance to taste-test all kinds of Mexican and Tex-Mex food, from high-end, award-winning places to less-fancy-but-still-delicious taco trucks that line the city.  And it was here in Houston, during college, that I fell in love with the cheap-but-filling tortas served up at this restaurant.

The torta is a Mexican-style sandwich, typically made on a crusty, baguette-type roll called a bolillo, with myriad possible fillings, including al pastor, or pork, which I did my best to recreate at home a few weeks ago.

Personally, I think this would make an excellent weekend sandwich, because it’s incredibly satisfying but not very fussy. Marinate the pork tenderloin ahead of time, grill it up outside and you won’t even have to heat up your house (bonus!)

sliced pork tenderloin

While it’s cooking, prep your accoutrement and lay it all out so everyone can make his/her own sandwich.  For an authentic accompaniment, try making elote with the last of sweet-summer corn.  Mexico City without the plane ticket, my friends!  Enjoy.

MEXICAN-STYLE PORK TENDERLOIN SANDWICH avocado cilantro pineapple
serves 4

components:

bread (bolillo roll or baguette)

pork tenderloin (1 lb- 1 ½ lb)*

chipotle mayonnaise*

sliced cheese (Mexican-style cheeses with a sharp flavor that will melt well include queso quesadilla, asadero, or chihuahua.  Substitute mild cheddar if you can’t find any of these)

sliced avocado

cubed pineapple

quick-pickled onions*

To assemble, lay the split rolls on a baking sheet and place cheese on one side of each.  Place under a low broiler or on the grill you just used to cook the pork until the cheese melts.

Slice up tenderloin to desired thickness & let everyone “have at” the sandwich making!

*PORK TENDERLOIN

If you’ve never used chipotle peppers in adobo sauce before, PLEASE go out and buy a jar now (they’re cheap!)  Chipotle peppers are simply smoked jalapeños but their flavor is amazing.
chipotle in adobo
marinade:

1 cup chipotle-flavored barbecue sauce
2 T honey
1 T chipotle peppers in adobo sauce

optional: I had an over-ripe peach which I peeled, pureed, & added to the marinade.

If you don’t have one on hand, throwing in some apricot preserves might make a nice counterpoint to the spice.

Grilling the tenderloin is easiest, searing it first on all sides over a medium-high flame, then moving it off the heat and letting it cook, grill cover down, for about 15 minutes.  Bring the tenderloin inside and let it rest, covered in foil, before cutting into it.

If grilling is not an option, your best bet is to sear the tenderloin on your stovetop, in either a grill pan or other heavy-bottomed pan, then transfer the whole thing to a 425° oven for about 15-20 minutes.

*CHIPOTLE MAYONNAISE

This isn’t rocket science, really.  Mayonnaise + fresh lime juice + a spoonful or two (depending on your heat tolerance) of chipotles in adobo.  Annnnnnd done!

*QUICK-PICKLED ONIONS

quick-pickled onions

I’m an onion lover.  Absolutely adore them any way they’re offered up, raw, grilled, pickled, fried.  In fact, my mom used to tell me when I was little that I’d better marry someone who loved onions and garlic as much as I do, otherwise I’d have a problem.  Thank goodness for Jill or I’d never get any kisses!

I know most people do not share my love of the onion.  However, pickling red onion is a great way to take the “edge” off of the taste but add flavor & crunch to your sandwich.  Pickled carrots, which you can also find pre-made on the same aisle as the chipotles in adobo, are a good alternative if you really just aren’t an onion fan.

Slice the desired amount of red onion thinly.  Bring between ½ cup to 1 cup of white vinegar to a boil, then add an equal amount of white sugar and a pinch of salt.  Add onions and remove from the heat.  Toss in a little cilantro & a pinch of cumin.  Let the onions sit in the liquid until ready to serve.

Share/Save/Bookmark

LAMB BURGERS

If you’re scared of this recipe already, bear with me.  Let me work with you.  I know you’ve been hurt by lamb in the past, but this time things will be different, I promise.  It’s not your fault that the lamb in your life has been over-cooked and served with mint jelly.  It doesn’t have to be that way.

545726169_dsc_0318
See?  That looks tasty, no?  Can you give lamb another chance?

I’ve made this recipe a few times, with lamb skeptics in the crowd each go-around.  My latest convert is none other than Sonya, our esteemed photographer, who had her first lamb burger last weekend at the end of a marathon cooking-and-picture-taking day.  When I told her I was planning to post about the burgers today, she said “Man, I’ve been craving those all week!”  Guess I’m going to have to make some more soon.

The only complicated thing about this recipe is locating the necessary ingredients. Depending on where you live, this actually may not be so complicated!  Most “mainstream” grocery stores sell ground lamb, and if you don’t see it out front, ask nicely at the meat counter; chances are they can grind some up for you.

Another option to check out is your local halal meat market, should you have one.  Halal is the rough Islamic equivalent of “kosher”–like kosher meat, any meat labeled “halal” has come from an animal slaughtered in a specific  way designed to ease the animal’s suffering.  One unique feature of halal meat is that all of the blood is drained before it’s sold.  This makes it a great choice for anyone feeling a little uncertain about the flavor of lamb, since draining the blood makes the flavor of the meat much more mild.

Continuing down the ingredient list…  545716200_dsc_0266

feta–the pre-crumbled kind is easiest here, but use whatever you like.

pine nuts–I love these things.  I throw them in pasta or serve them with roasted broccoli & fat shavings of Parmesan.  And, they add the perfect toothsome texture to these burgers–really, don’t leave them out.  Store any extras you have in the fridge to keep them from going rancid.

the herbs–fresh really is best (and hey, mint is super-easy to grow!), but if you buy from the store, keep your leftover herbage (to coin an Alton Brown term) in the crisper, nestled into a large Ziploc bag with a paper towel.  I can seriously keep flat-leaf parsley going for a month this way.

allspice–you may not already have this around, but it adds amazing flavor to all kinds of things: jerk-style chicken, chili, baked goods, homemade sausage, barbecue sauce, etc.

Simply put, these burgers are GOOD.  I’ll bet you could make them for people without telling them they were lamb, and the people would eat them, and the people would like them, and then you could surprise the people, but I guess that’s a little bit sneaky/unethical, huh?

Have you ever “converted” someone to liking an ingredient they previously disliked?  Or been converted?  If so, I’d love to hear about it!  Comment away.

LAMB BURGERS  545725282_dsc_0314

1 1/2 pounds ground lamb (if you absolutely can’t stomach the thought, substitute ground turkey)

1/2 cup feta (or other goat cheese), crumbled

1/4 cup pine nuts, toasted

1/4 cup each fresh mint & flat-leaf parsley, chopped

1/2 red onion, diced

2 cloves garlic, minced

1 T allspice

zest of one lemon (optional)

salt & pepper

accompaniments: hamburger buns, sliced cucumber, red onion, dill mayonnaise* OR pita bread, cucumber, onion, tzatziki sauce*

Saute garlic & onion in olive oil over medium-low heat until translucent.  Allow to cool a bit before combining with the other ingredients in a large bowl.  Mix thoroughly–hands are best for this!–and form into patties.  Traditional hamburger-style, I recommend you make your burgers wider than the buns you plan to use, as the patties will shrink when you cook them.  I got six out of my last batch.

Alternately, if you’re serving with pita, make a bunch of small, flat-meatball-ish sized patties (about 12-15) so they’ll stuff into the pocket more easily.

Heat up your grill pan or outdoor grill (I don’t recommend outside if you are making small patties–they don’t skewer well).  Grill over medium-high heat on both sides to achieve a nice, brown crust.  Either turn heat down or move burgers to indirect heat and continue cooking until desired doneness is reached (we like a little pink in the middle).  On my stove-top grill pan, one batch took approximately 8-10 minutes.

545722730_dsc_0307

Serve immediately with accompaniments.  Enjoy!

Dill Mayonnaise

1/2 cup mayonnaise
1 T fresh dill, chopped or 1 tsp. dried
1 clove garlic, minced fine

Combine all ingredients and mix until smooth.  Resist the urge to slather this all over everything.  (Or, if you’re me, fail to resist said urge).

Tzatziki Sauce

This is a traditional Greek condiment, so it works best with thick, Greek-style yogurt.  If you can’t find that, use plain, full-fat yogurt.

1 cup plain yogurt
1 small cucumber, peeled & grated
1-2 cloves garlic, minced
1 tsp. fresh dill or 1/2 tsp. dried
juice of half a lemon

Squeeze grated cucumber in a paper towel to remove excess moisture.  Combine the rest of the ingredients–if you make this ahead of time, the garlic flavor will become more intense.

Share/Save/Bookmark